
I.Polished tilesHow to apply
1、Method for installing and polishing dry-mounted tiles
① First, conduct wire inspection and then order the materials. This approach allows for better control over brick dimensions and edge finishing, as the bricks are processed by the distributors rather than on-site.
② Subsequently, the workers begin to secure the fixtures according to the provided drawings (small fixtures specifically designed for attaching polishing tiles are available on the market). After the tiles arrive, they are glued to the back of the tiles using cloud stone adhesive (approximately 10cm x 6-7cm in size). These tiles are cut from larger tiles or stone, and are used to create slots on the back for attaching the fixtures.
③ After installing the two layers, apply a stronger adhesive to the prefabricated brick pieces and attach them to the gaps between the layers, providing temporary fixing. Proceed to the top and then, after the cloud stone adhesive has set, remove the temporary fixing bricks and seal.
2、Wet-setting method for polished bricks
① Surface Preparation: The substrate should be solid, smooth, and clean, free from contaminants, loose particles, and voids. Primers, release agents, and roughened concrete surfaces should be prepared before application.
② Add approximately 7L of water to 25kg of polishing tile adhesive powder. Add the water first, then add the powder. Mix with an electric mixer until a smooth, non-grainy paste is formed. Allow to rest for 3~5 minutes before using.
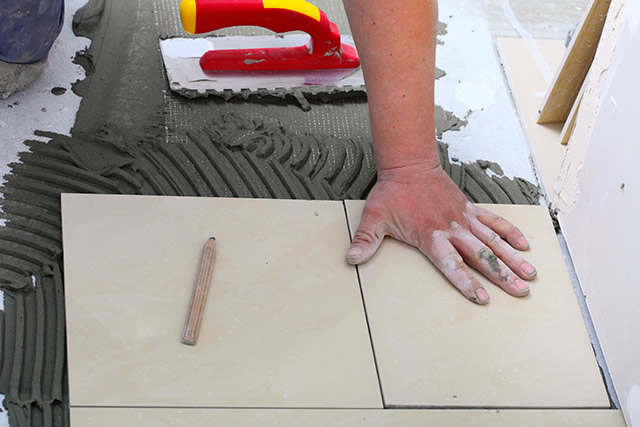
③ Use a notched trowel to evenly apply the tile adhesive paste on the work surface. Then, press the tiles or stone onto the substrate and adjust the tiles for proper alignment. When adhering, apply the tiles from bottom to top.
④ When installing tiles or stone with deep grooves, in addition to the working surface, it is also necessary to apply adhesive to the back of the tiles or stone to prevent air pockets. Thoroughly clean the polished tile surface before completion and final cleaning.
II. Installation Specifications for Polished Tiles
1、When unpacking tiles or panels, carefully check and verify the product specifications, dimensions, and color codes. Ensure that products with the same color code are applied to the same area, and do not mix products with different color codes.
2. Check that the substrate is dry and clean, free from oil, grease, and other loose materials. Verify that the substrate has sufficient surface strength, smoothness, and verticality.
3. Mix the polished tiles with water in a ratio of 25kg:7L. Stir until a uniform paste forms. Allow to rest and mature for approximately 2-3 minutes, then stir again.
4. Apply the adhesive evenly to the work surface using a notched trowel, with an application area of approximately 1 m². Then, press and level the tiles or panels onto the substrate, and ensure the tiles are aligned correctly. When applying the tiles, adhere them from the bottom up.
5. When adhering tiles or panels with deep grooves, in addition to the working surface, apply adhesive to the back of the tiles or panels to prevent air pockets.
6、After laying and polishing bricks or boards, before use, to prevent damage to the brick surface during subsequent construction projects, use non-discoloring materials such as woven bags to protect the surface.